Cold-Crafted Hummus

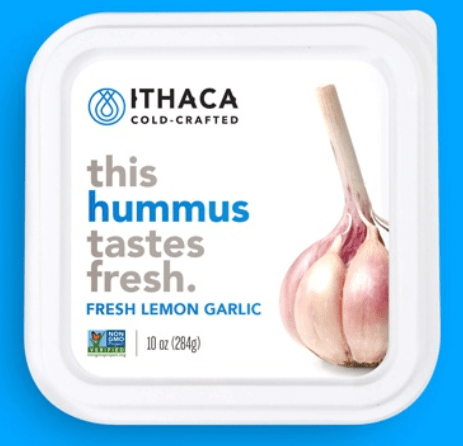
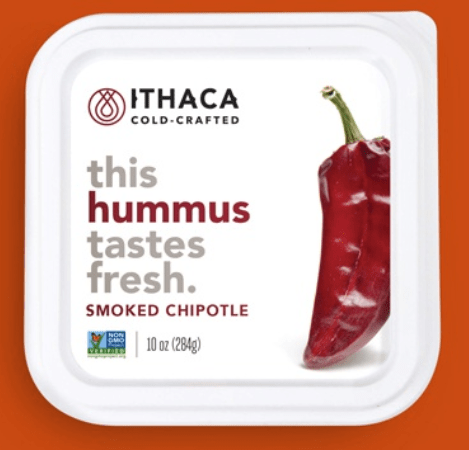
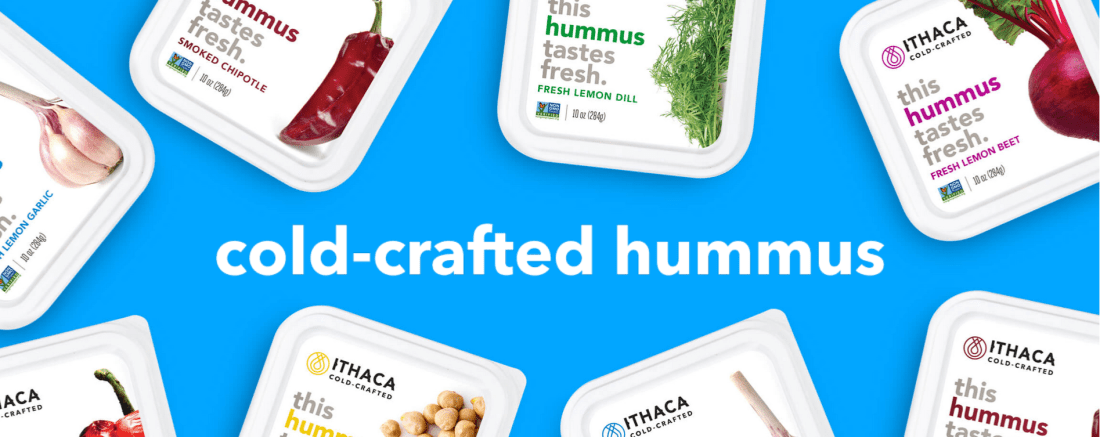
I was always “so/so” on hummus. I liked it for a little bit, but then got tired of the taste and never finished a single can/box that I had bought. However, I discovered this brand of hummus that has made me an addict lately! It’s so tasty and the various flavors help satisfy any cravings I may have!

I always ate hummus from Sabra. I would try their various flavors, but nothing really “did it” for me (as mentioned above.) However, Ithaca Cold-Crafted hummus has changed my opinion on hummus forever!! Their brand tastes AMAZING and offers so many flavors that satisfy my cravings when I’m wanting something salty. I buy a box of what I’m craving and a bell pepper (yellow bell peppers are my favorite) to dip the hummus with, and I’m eating GOOD food with no ragrets! Here are some of my favorites:

Homemade Chili

I love chili, especially when the weather is cold or dreary outside! I also love how easy it is to modify chili’s recipe to fit any health aspect. This is the chili recipe I’ve used throughout my journey and all the modifications I’ve made to it! Enjoy!

Ingredients

  • Ground beef OR ground turkey OR meatless beef by Gardein undefined
  • 6 oz can of tomato paste
  • 28 oz can of Diced tomatoes
  • 1 can of chili beans
  • 1 package of McCormick chili mix (I use original with 30% less sodium) undefined

Instructions

  1. Cook your meat on a skillet. (My mom’s recipe used ground beef. When I started my health journey, I used lean ground beef. I switched to turkey later in my health journey [super good!], and now I use meatless ground beef which tastes just like ground beef!)
  2. Mix the tomato paste, diced tomatoes, and chili beans together in a crock-pot. (My mom uses the whole cans I’ve listed in the “ingredient” section. I use about 2 tbsp of tomato paste, the whole 28 oz can of diced tomatoes, and 1/2 can of chili beans.)
  3. Add the meat and chili mix to your crock-pot. Make sure to stir all the ingredients together and stir on occasion.
  4. Serve when you believe the chili is ready! I like to put my mixture together in the morning, set the crock-pot on low temperature, and serve around 6pm.

I love eating chili with sour cream and cheese! I use light sour cream and reduced-fat OR dairy-free cheese (it’s actually really good when melted!)

Açaí Bites

Y’all know I love açaí anything! I discovered this dessert at a local grocery store in Florida last summer. The store was packed with products from Sambazon (lead açaí seller,) and one of them was their açaí bites (pictured below.) I couldn’t find these things ANYWHERE else, so I experimented with making my own and I think I got the perfect recipe!

Ingredients

  • Sambazon açaí original mix
  • Almond milk (I use unsweetened, but if you want your dessert to taste sweet, use sweetened!)
  • Honey
  • Sugar (optional)
  • Banana (optional)
  • Chocolate (I used vegan dark chocolate, but use whatever you’d prefer!)

Instructions

  1. Make your açaí mixture in a blender. This is totally up to you, but mine is like this: 1 açaí pack, 2 tbsp of almond milk, 1 tbsp of honey. You can add more honey or sugar to make yours sweeter and add a banana if you want your mixture to be less “icey” once frozen.
  2. Melt your chocolate. I melt mine in a bowl in a microwave (college life,) but do whatever works best for you!
  3. Take an ice cube tray and cover each spot with a decently thick layer of melted chocolate. (This was tricky and I ended up using my fingers. I think a tray that is ‘bendable’ is best so you can pop the spots up to cover them then flip them down to cool.) Place in the freezer until frozen solid (mine took around 5 minutes to freeze.)
  4. Spread your açaí mixture into each spot on your ice cube tray. Place in the freezer until mixture is frozen (mine took around 10-15 minutes to freeze.)
  5. Top each spot off with a solid layer of melted chocolate. Place in the freezer until the top layer is frozen. Enjoy!

I love açaí and this desert has been a favorite of mine! Sambazon has other recipe ideas that I have yet to try, but you should look at other recipes they offer if you’re interested! Click here to explore on their website!

Baked Overnight Oats!

I still struggle with eating breakfast because I’m always on the go and would rather take the extra 15 minutes of sleep (college is hard, y’all…) But I know that breakfast is important and it really helps to kick start the day, so I’d been looking for a quick breakfast to make that’s healthy and tasty… and I found it!

Ingredients

  • 2 cups of fruit (I prefer blueberries, blueberry/strawberry mix, or strawberry/banana mix)
  • 2 cups old-fashioned oats
  • 1/2 cup chopped pecans
  • 1 tsp ground cinnamon
  • 1 tsp baking powder
  • 1/2 tsp salt
  • 2 cups almond milk (I prefer unsweetened)
  • 1/4 cup maple syrup
  • 2 tbsp flaxseed (I’ve been using Chia seeds instead)
  • 1 tbsp melted coconut oil
  • 2 tsp vanilla extract

Instructions

  1. Preheat oven to 375 degrees. Grease a 9x9in baking dish.
  2. Place 1 cup of your fruit of choice at the bottom of your greased baking dish.
  3. In a large/medium sized bowl, whisk together the oats, pecans, cinnamon, baking powder and salt. Once finished, spread the mixture on top of the fruit in your baking dish. Be sure to spread evenly.
  4. In the previous bowl or another small bowl, whisk together to almond milk, maple syrup, flaxseed, coconut oil and vanilla extract. Pour the liquid over the oat mixture in your baking dish; be sure to spread evenly.
  5. Place the remaining cup of fruit on top of your oats in your baking dish.
  6. Bake for 35-40 minutes or unit golden brown. Cool for around 5 minutes.

I cut my dish into 3 rows and 3 columns to make 9 breakfasts! Just cover the mixture in your fridge and heat-up a piece for about a minute! I like to add Greek yogurt and maple syrup to mine when I eat them! SO GOOD!!!

Meatless Meat Meals!

I’m not a vegan or vegetarian, but I love vegan meals! They are tasty and satisfying and I never get a “too full” feeling, I always get a satisfied feeling! They give me the perfect amount of energy and I cannot recommend them enough!!

I’ve just recently gotten into eating meatless meat, but these options from Gardein are the ones that have captured my eyes and stomach! Here are the ones I’ve tried so far:

It’s CRAZY to believe that these tenders are not made of real chicken! The taste and the texture are the EXACT same as regular chicken tenders!

Again, also hard to believe these are not made of meat! They taste great, zesty and the texture is the exact same! WARNING: marinara sauce and cheese not included 🙂

Try pairing your meatless meat with healthy sides! I prefer salad with balsamic dressing and a little bit of Parmesan cheese or veggies like broccoli!

Vegan Banana Nut Muffins

I loved the vegan muffins I used to get every Wednesday and Saturday this past summer, and I have been searching endlessly for a recipe that closely resembles their vegan banana nut muffins (they were TO DIE FOR!!!!) And…. I’ve *finally* found it!! Enjoy! 🙂

Ingredients

  • 1 batch of flax egg (1 Tbsp of the flax egg mixed with 2 Tbsp of water, let sit for a minute or two)
  • 3-4 medium extremely ripe bananas (recipe calls for 3, I use 4)
  • 1 tbsp baking powder
  • 1 tsp baking soda
  • 1/2 tsp pure vanilla extract
  • 3 tbsp olive oil
  • 1/4 cup coconut sugar OR cane sugar
  • 1/4 cup brown sugar
  • 2 1/2 tbsp maple syrup
  • 3/4 tsp salt
  • 3/4 cup unsweetened almond milk
  • 1 1/4 cup almond meal
  • 1 1/4 cup of oat flour
  • 1 1/4 cup oats
  • 1 cup of chopped walnuts
  • extra coconut sugar, cane sugar or brown sugar to sprinkle on top (optional)

Instructions

  1. Preheat oven to 375 and align a 12 cup tray with baking cups.
  2. Mash the bananas in a large mixing bowl then add the flax egg, baking powder, & baking soda. Mix/mash until small chunks of the bananas remain.
  3. Whisk in the vanilla, olive oil, coconut/cane sugar, brown sugar, maple syrup, & salt. Add almond milk in slowly and whisk each time until the mixture is liquid.
  4. Whisk in the almond meal, oat flour, and oats to make the mixture more solid. Then, fold in the walnuts.
  5. Fill each muffin tin with the mixture until there is none left.
  6. (OPTIONAL) Sprinkle coconut, cane or brown sugar on top of each muffin before baking.
  7. Place the muffin tray in the oven for 28-35 minutes. Let cool for around 5 minutes. Enjoy!

Chia Pudding

I had no idea what to think of chia pudding when I first tasted it. It’s so bizarre in texture, but the more I ate it, the more I liked it! I really like it as a parfait! That makes chia pudding so customizable for whatever you’re in the mood for! You can have it at breakfast, as a snack, or a dessert depending on how you make it!

There are two ways to make the basic chia pudding:

Option One (makes 1-2 servings):

Using a mason jar or bowl, pour 3/4 cup of almond milk (I prefer unsweetened) into 2 tbsp of chia seeds and add 2 tsp of maple syrup, honey, or sweetener to the mix. Let the mix set (I prefer to refrigerate over night).

Option Two (makes 2-4 servings):

Using a mason jar or bowl, pour 2 cups of almond milk into 1/2 cup of chia seeds. Add in 1/2 teaspoon of vanilla extract and 1 tablespoon of maple syrup, honey or sweetener. Let the mix set (I prefer to refrigerate over night).

From the basic chia pudding, there are several ways to make great parfaits! Click here for some great ideas!

Peanut Butter & Banana Toast

Y’ALL!!! This is so so good! I’d seen this posted over Instagram and various other blogs, but I just tried it a few weeks ago and I’m hooked! It’s so quick, customizable, and delicious! I like it around Lunch time, but it’s also a great snack/breakfast!

Ingredients

  • Sandwich bread (I prefer Ezekiel bread)
  • 1/2 Banana
  • Peanut butter (option to use almond butter instead!)
  • Toppings (optional). Some good ideas: chia seeds, honey, mini chocolate chips

Simply toast the bread, spread the peanut butter once the bread is out of the toaster, chop the banana into slices and lay them on top of the peanut butter spread, then sprinkle any topping(s) you’d like (I normally add honey.) SO GOOD Y’ALL!!

I’ve been using substitutions to decrease the calories from the peanut butter. I really like PB Fit’s powder! It’s so much lower in calories, and it tastes great! I like RX’s brand for almond butter.

Cheesy Broccoli Chicken Pasta

YUM!!! I *love* pasta (trust me, I ate plenty of spaghetti when I was aiming for my first goal!) and this recipe is so good!!!

Ingredients (for one serving)

  • 3/4 cup Pasta (I prefer Farfalle)
  • Cooked boneless, skinless chicken breasts cut into cubes (I normally just use frozen, pre-cut, grilled chicken. I used 2-3 strips per serving)
  • 1/4 cup Broccoli (I sometimes used a veggie mix and liked it the same!)
  • 3 tablespoons shredded cheese (I prefer Italian blend)
  • 1/2 tablespoon milk
  • 1 oz cream cheese
  • 1/2 teaspoon Dijon mustard (optional)

Instructions

  1. Boil pasta in water until cooked. Drain water until there’s just a little left in the pot. (The best way I can describe it: keep it wet, but don’t have a pond!) Keep pot on stove with low/medium temp on.
  2. Add the chicken and broccoli in next, stir until both are warm (5 minutes or less).
  3. Add in the remaining ingredients and cook/stir until cream cheese & cheese have melted. Add salt/pepper if desired! Enjoy!

Chicken can be substituted for other meat(s)! Keep in mind this is a recipe for one serving! If you want to make it for a large group, double/triple/etc. things up!!

Angel Cake with Strawberries & Whipped Cream

This is an all time favorite of mine at parties or meetings!

I normally just buy an angel cake from the store; however, I found a recipe for angel cake that I’m eager to try and I’m going to put the link here.

Ingredients

Instructions

  • Cut strawberries, mix them with Splenda, put them in a container, and let them sit overnight. (I try to do about a tablespoon per cup of strawberries)
  • Make the homemade whipped cream (link attached above)
  • Bring the strawberries, cake, and whipped cream to the party and serve!